Once you enter the form builder you be offered 4 methods to create a new form:
1. Blank Form
2. Template
3. Wizard
4. Salesforce
5. From URL

1. Blank Form
create a new blank form yourself
In order to do this you will need to:
| 1- | Drag an element from the "Elements" panel (on the left) and drop it on the canvas. |
| 2- | Once an element is dragged on canvas (or selected) - its Settings and style will appear in the "Properties" panel (on the right), and you will be able to configure them according to your needs. In the "Settings" tab You will be able to give your element its label text, enter a placeholder text and user tip. Maybe you would like to make this element mandatory, or unique, or add a condition to it...all this can be done in the "Element Settings". In the "Style" tab you will be able to change style attributes of your element or part of it, such as font, background, border, alignment, padding etc. |
| 3- | Publish your form and Start using it. |
| 4- | Give your form a name (In "Properties" panel > "Form" Settings Tab > Basic > General > Form Name) |
| 5- | Publish your form Watch a srater video on how to create a blank form |
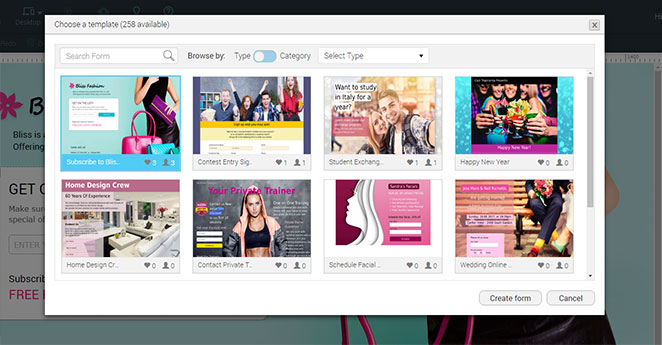
2. Template
Choose a free form template
This option enables you to set up your form in the easiest and quickest way: It offers you the choice of ready made free form templates. All you have to do is:
| 1- | Choose a template. |
| 2- | Press on the "Create Form" button. |
| 3- | The form will now open on the canvas and you will be able to edit it: add/remove elements, change properties and style. |
| 4- | Give your form a name (In "Properties" panel > "Form" > Settings Tab > Basic > General > Form Name) |
| 5- | Publish your form and start using it. |
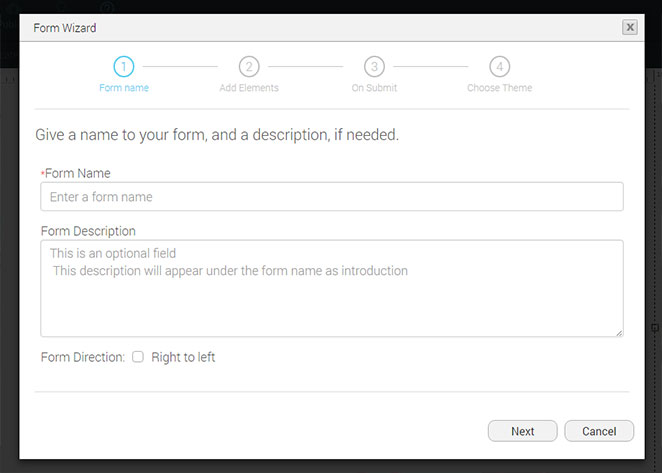
3. Wizard
Choose elements and theme using our wizard
The wizard enables you to set up your form not via drag & drop, but rather in an automated way, by choosing the elements and theme. All you have to do is:
| 1- | Give your form a name, description (not required) and form direction (RTL or LTR) |
| 2- | Add elements by choosing them from a dropdown list and making the required basic configurations for each one. |
| 3- | Add a custom thank you message that will appear once the form is submitted, or redirect to URL. |
| 4- | Choose a theme and press "Finish". |
| 5- | Give your form a name (In "Settings" panel > "Form" Settings Tab > Basic > General > Form Name) |
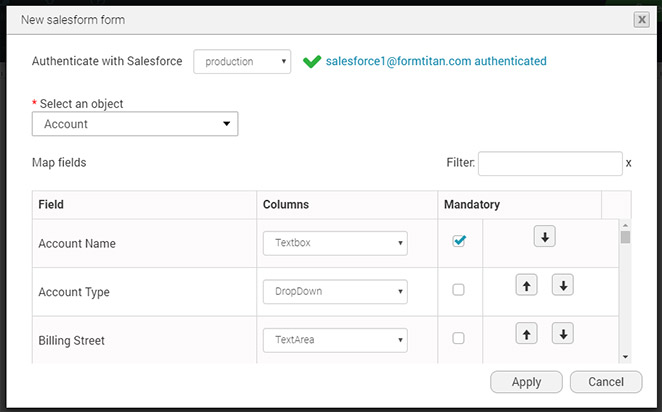
Create a new form from a salesforce object
This option allows you to create a new form in an automated way, by choosing the salesforce object and fields, a relevant form will be created for you. All you have to do is:
| 1- | Authenticate with Salesforce |
| 2- | Choose the Salesforce object you want to base your form on. |
| 3- | All of the object fields will now appear below and you will need to map them to an element type of your choice. |
| 4- | Turn on the "mandatory" checkbox for elements you want to make required. |
| 5- | Use the Up/Down arrows to determine the fields order. |
| 6- | Press on "Apply" and the form will automatically be created for you on canvas, containing the fields you configured. |
5. Form URL
Import a form from a URL
Use a form which is already set up and working,
In order to do this you will need to:
| 1- | Choose the platform the form was created with: Wufoo, JotForm, or Formstack. |
| 2- | Enter the form URL and press "load". |
| 3- | The form preview will appear in a thumbnail on the right |
| 4- | A table, containing the form fields will appear below, and it will allow you to create your new form on the basis of the url chosen. You will simply need to specify, in the second column, what type of element you would want to use. For example: for "Your name" field you can use a textbox or a full name element. |
| 5- | You can make the fields mandatory if needed or even remove them. |
| 6- | Press on "create form" and the form will open on the form builder cavas. ready to use. |
| 7- | You can now continue editing form, changing style/ properties etc. |
| 8- | Publish your form and start using it. |