

Salesforce Document Generation – Word and Excel Templates
Business Background
Easily configure Salesforce document generation with Titan Web.
Titan Solution
- Configure Salesforce document generation by adding Microsoft Word and Microsoft Excel templates to a project.
- For Word and Excel templates, you can do the following:
- Preview
- Download
- Generate Interactive
- Edit
- Push to Salesforce
- Editing this uploaded template does not impact or alter the original document.
How to Video
Video Coming Soon!
How to Guide
Prerequisite:
A Word template must contain interactive Salesforce fields or fields from a Web project added with the Titan Word add-in.
An Excel template must contain interactive Salesforce fields added with the Titan Excel add-in.
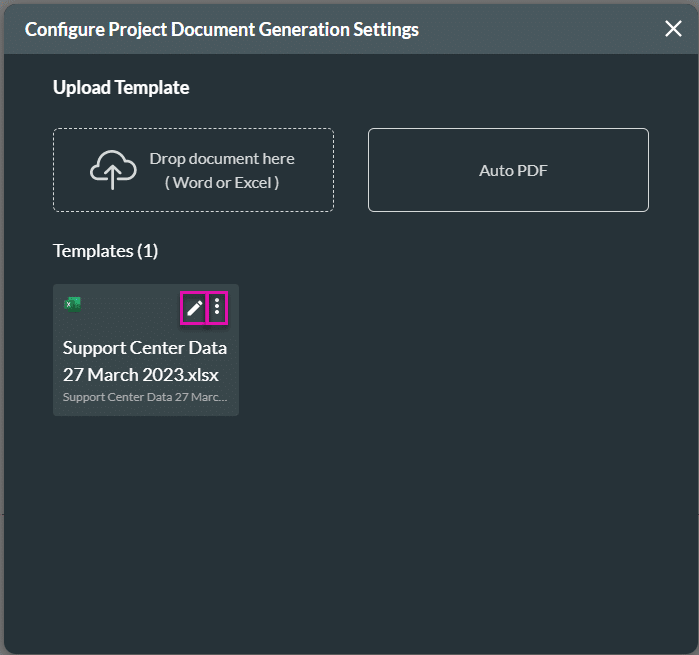
- Drop a Word or Excel document in the block from your file explorer. The file is added to the screen.
- Alternatively, click in the block to upload a document. The standard Microsoft Open screen opens.
- Browse to the file destination and click on the required file.
- Click on the Open button. The file is added to the screen.

The uploaded Excel and Word documents will be fully dynamic.
- Do the following if necessary:
- Click the X icon next to the document name to delete the document.
- Click on the Download Template option to download the template.
- Use the Drop document here block to replace the uploaded template.
- You will see a confirmation message: “Please confirm: You are about to replace the template.”
- Click the required button.
- Click on the View Versions option to view the version of the template. The View Versions screen opens.

- Click the Next button on the Configure Project Document Generation Settings screen.
- Use the checkboxes to select option/s. The document in each option will be in DOCX or PDF format:
- Preview: Preview a generated and populated document.
- Download: Download a dynamic document.
- Generate Interactive: Generate a document containing interactive fields that your end user can edit.
- Email: Send the template as an email attachment.
- Edit: Generate an editable document in DOCX or PDF format. The edited document can be pushed to Salesforce.
- Push to Salesforce: Push a DOCX or PDF document to Salesforce in the desired output format.
- Click the Next button.

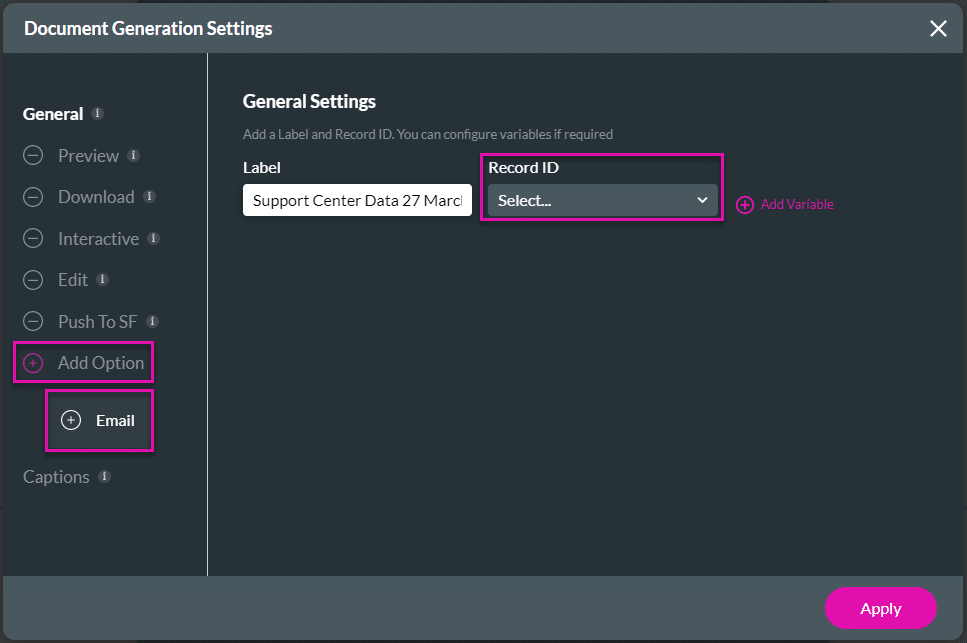
- Under General, change the label of the template if necessary. The document name is added by default.
- Use the drop-down list to add a Record ID. (This is either an input field or a custom variable that you added to the project.)
The options on the left of the screen under General depend on the options you selected on the previous screen.
You can add options:
- Click the + icon in front of Add Option.
- Click the + icon in front of an option to add it to the list.
- Configure the options that you selected:
- Change the captions if necessary.
- View where the template was used.
Preview
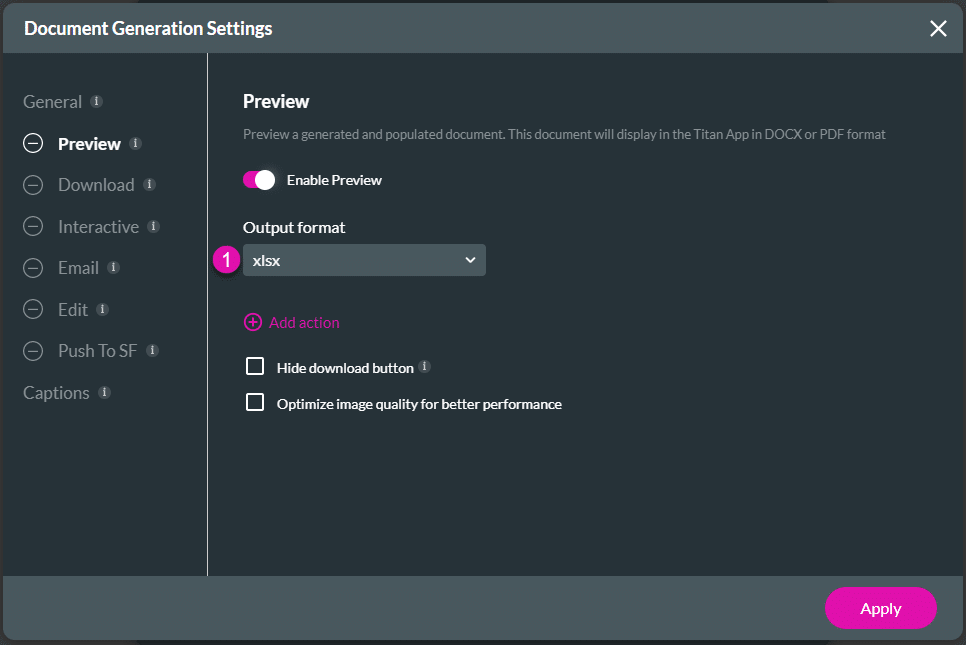
- Click the Preview option.
- Use the toggle switch to enable the Preview functionality.
- Use the drop-down list to select an output format:
- docx
- xlsx
- Use the drop-down list to select a program to view the Word (docx) document.
- Microsoft
- Titan (recommended)
- Use the Zoom drop-down list to select an option.
- Fit to device
- Select a zoom percentage.
- Use the Zoom drop-down list to select an option.

- Under the Preview option, do the following for Excel (xlsx) spreadsheets:
- Use the drop-down list and select the xlsx option.
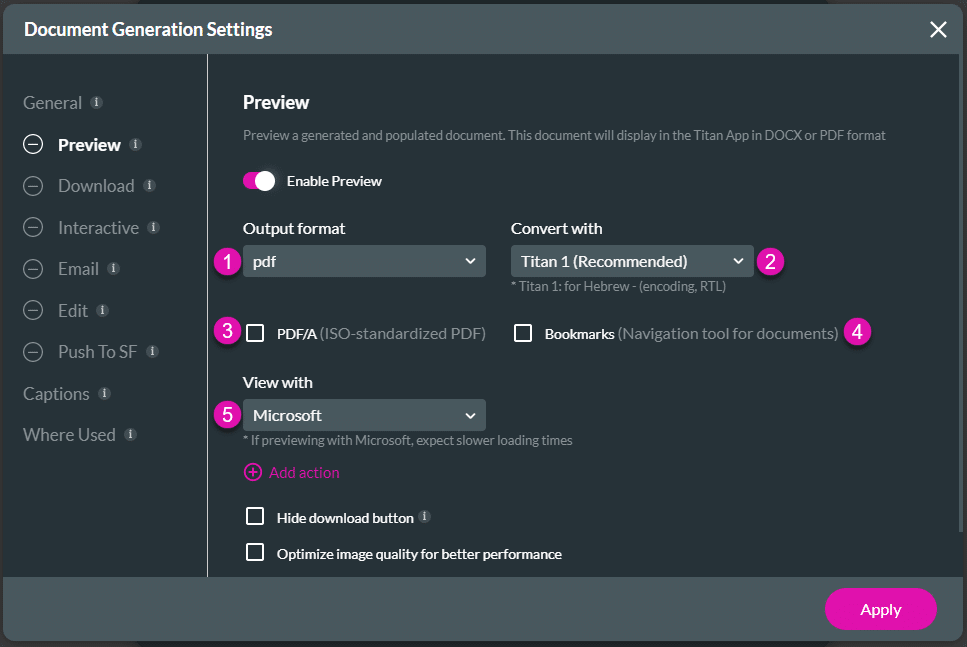
- Under the Preview option, do the following for PDF documents.
- Use the drop-down list and select the pdf option.
- Use the drop-down list to select a program to convert the pdf document.
- Libre Office
- Office 365
- Titan (recommended)
- Use the Zoom drop-down list to select an option.
- Fit to device
- Select a zoom percentage.
- Use the Zoom drop-down list to select an option.
- Titan 2
- For the Titan (recommended) option, use the checkbox to activate the PDF/A option if necessary. This is the ISO-standardized PDF.
- For the Titan (recommended) option, use the checkbox to activate the Bookmarks option if necessary. This is the navigation tool for documents.
- Use the drop-down list to select the option to view the document.
- Microsoft
- Titan 1 (Recommended)
- Use the Zoom drop-down list to select an option.
- Fit to device
- Select a zoom percentage.
- Use the Zoom drop-down list to select an option.
- Titan Mini
- Use the Zoom drop-down list to select an option.
- Fit to device
- Select a zoom percentage.
- Use the Zoom drop-down list to select an option.
- If necessary, do the following:
- Click the Add action option and add button text.
- Click the Configure Action button to configure an On Click Action.
- Click the checkbox to hide the download button.
- Click the checkbox to optimize the image quality for better performance.
- This will reduce the image quality to 80% of the original and will therefore reduce the file size.

Download
- Click the Download option.
- Use the toggle switch to enable the Download functionality.
- Use the drop-down list to select an output format:
- xlsx
- docx
- pdf
- Use the drop-down list to select a program to convert the pdf document.
- For the Titan (recommended) option, use the checkbox to activate the PDF/A option if necessary. This is the ISO-standardized PDF.
- For the Titan (recommended) option, use the checkbox to activate the Bookmarks option if necessary. This is the navigation tool for documents.
- Use the drop-down list to select a program to convert the pdf document.
- Use the toggle switch to add a dynamic file name if necessary.
- The Custom Name field changes to a drop-down list where you can select the dynamic file name.
- Type a custom name.
- Use the toggle switch to enable the actions while waiting: Freeze the screen while the template is generating.
- Click the checkbox to optimize the image quality for better performance.
- This will reduce the image quality to 80% of the original and will therefore reduce the file size.
- Use the toggle switch to enable the actions while waiting: Show a progress bar.

Interactive
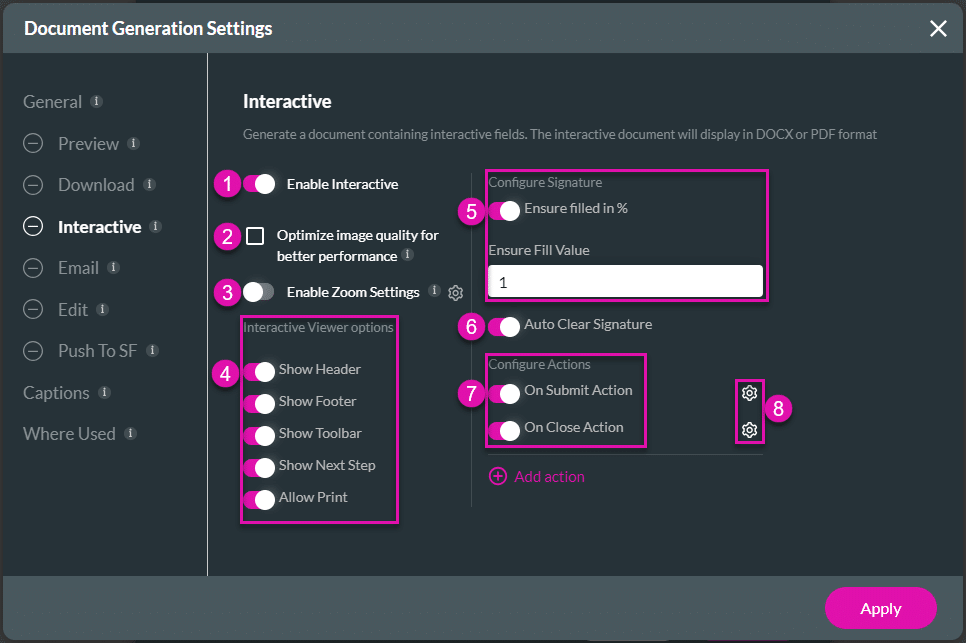
- Click the Interactive option.
- Use the toggle switch to enable the Interactive functionality.
- Click the checkbox to optimize the image quality for better performance.
- This will reduce the image quality to 80% of the original and will therefore reduce the file size.
- Use the toggle switch to enable the Zoom Settings.
- Click the Gear icon to open the Document Generation Device Zoom screen.
- Use the drop-down list to select general zoom options. This is the default option.
- Click the Custom zoom radio button to configure the custom zoom options for desktop, laptop, tablet (L), tablet, mobile (L), and mobile (S).
- Click the Gear icon to open the Document Generation Device Zoom screen.
- Use the toggle switches to enable the Interactive Viewer options:
- Show Header
- Show Footer
- Show Toolbar
- Show Next Step
- Allow Print
- Use the toggle switches to enable the Ensure filled % option.
- When this option is enabled, the signer will be required to make a signature larger than the percentage specified in the “Ensure Fill Value” field in the signature box.
- This will prevent the signer from simply making a dot in the mandatory signature field.
- Add a positive integer number in the Ensure Filled Value field. One or two percent is sufficient.
- Use the toggle switches to enable the Auto Clear Signature option.
- The signature field will be cleared after the document was submitted.
- Use the toggle switches to enable the Configure Actions options:
- On Submit Action
- On Close Action
- Use the Gear icons to configure the actions:
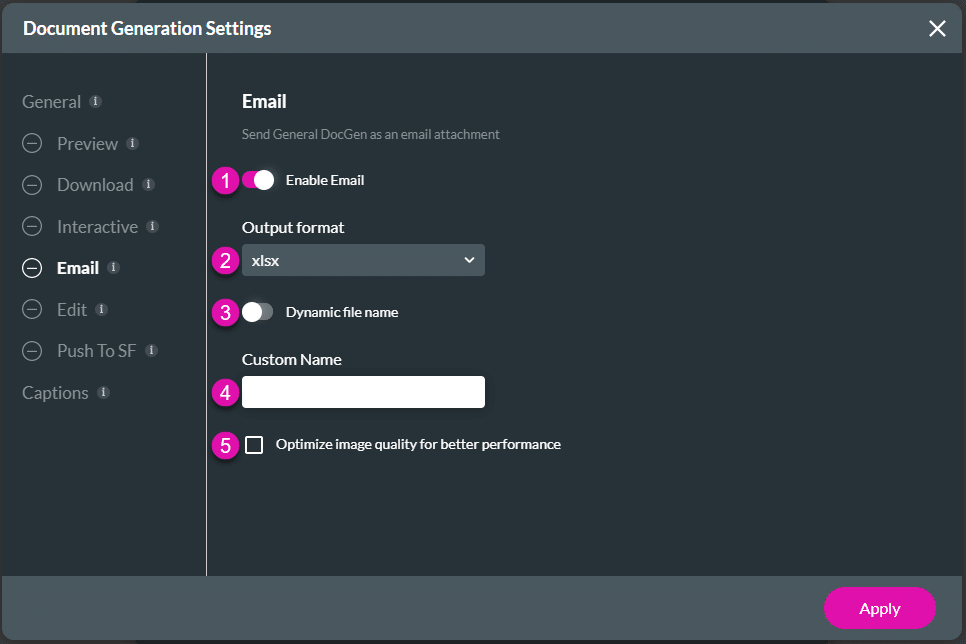
- Click the Email option.
- Use the toggle switch to enable the Email functionality.
- Use the drop-down list to select an output format:
- xlsx
- docx
- pdf
- Use the drop-down list to select the program to convert the document.
- Use the toggle switch to add a dynamic file name if necessary.
- The Custom Name field changes to a drop-down list where you can select the dynamic file name.
- Type a custom name.
- Click the checkbox to optimize the image quality for better performance.
- This will reduce the image quality to 80% of the original and will therefore reduce the file size.
Edit
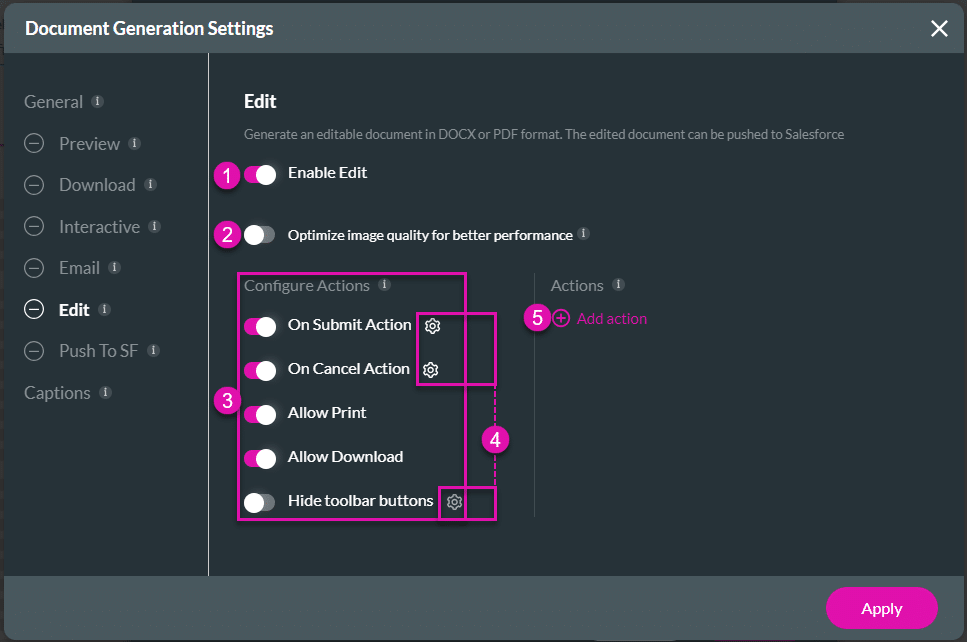
- Click the Edit option.
- Use the toggle switch to enable the Edit functionality.
- Click the checkbox to optimize the image quality for better performance.
- This will reduce the image quality to 80% of the original and will therefore reduce the file size.
- Use the toggle switches to enable the Configure Actions options:
- On Submit Action
- On Close Action
- Allow Print
- Allow Download
- Hide toolbar options
- Use the Gear icons to configure the actions:
- On Submit Action
- On Close Action
- Hide toolbar options: Use the modal to hide the accessibility settings.
- If necessary, click the Add action option to configure another action you may need.
Push to Salesforce
- Click the Push to Salesforce option.
- Use the toggle switch to enable the Push to Salesforce functionality.
- Use the drop-down list to select an output format:
- xlsx
- docx
- pdf
- Use the drop-down list to select the program to convert the document.
- Use the toggle switch to add a dynamic file name if necessary.
- The Custom Name field changes to a drop-down list where you can select the dynamic file name.
- Type a custom name.
- Click the checkbox to optimize the image quality for better performance.
- This will reduce the image quality to 80% of the original and will therefore reduce the file size.
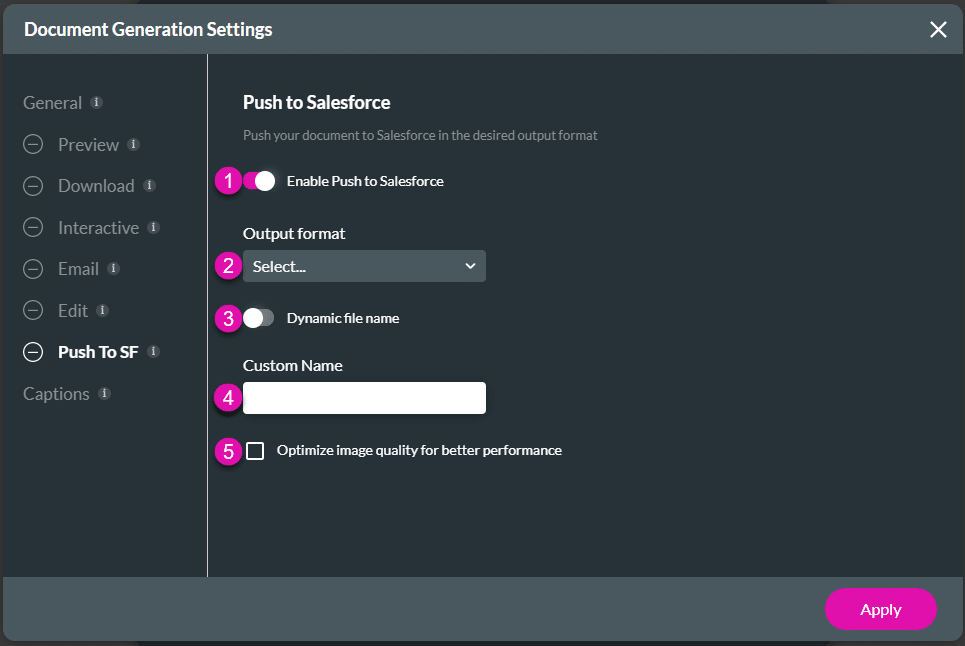
- Make sure that you configure the Salesforce Push.
Digital Signature
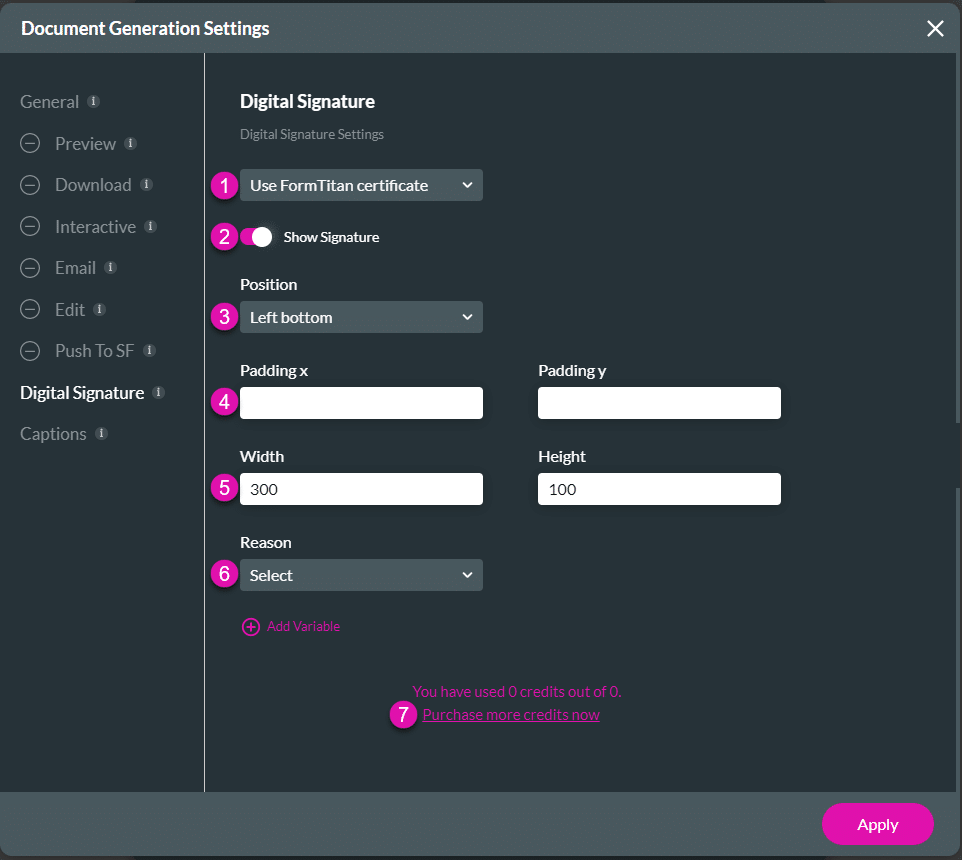
Make sure that you used the toggle switch to enable a Digital Signature, either under the Download or the Push to Salesforce option.

- Use the drop-down list to select an option.
- Use Form Titan certificate
- Use your certificate. If you select this option, the rest of the screen options are no longer shown.
- Use the toggle switch to show the signature.
- Use the drop-down list to select a position.
- Left bottom
- Right bottom
- Left top
- Right top
- Type the value for the padding in the X and Y fields.
- Type the value for the width and height in the fields.
- Use the drop-down list to select a reason.
- Other. Add the reason in the field.
- Variable (This is a variable that you added to the project.)
- Purchase more credits if needed.
Captions
- Click on the captions option to change any of the captions.

Where Used
- Click the Where Used option to view where the document generation is triggered.

- Click the Apply button. The Word or Excel template is added.
- Use the Edit icon to edit the template.
- Use the Kebab icon to do one of the following:
- Turn Off
- Delete
Add the Document Generation to an action flow
- Configure an On Click Action on an element.
- Click the + icon to add a node.
- Under User Interaction, select the Document Generation option and click the Next button.

- Use the drop-down lists to select the following:
- Template
- Action
- Click the Next button.
- Add a tag if necessary and click the Insert button.

If you are interested, check out our Salesforce document generation article for a comparison of the 10 best tools in the market.