CRO, also known as Conversion Rate Optimization, is a term in internet marketing for a method to increase the percentage of visitors to a website, landing page or form. This marketing approach emphasizes tracking, testing, and on-going improvement. A conversion rate is defined as the percentage of visitors who complete a goal, as set by the site owner.
Many researches are conducted In order to find out what "works" and as a result you can find a lot of documentation and tips on the do's and don'ts of online forms and landing pages. These CRO rules may focus on many different aspects: for example, some tips may indicate the impotence of your call-to-action, making it more apparent, while other tips may recommend to remove unnecessarily steps/ fields from your form to reduce friction and prevent form abandonment.
FormTitan is the only online form builder with an innovative built in CRO engine. Its CRO engine is located at the top of the form builder screen, along with the other important actions (such as preview or publish) and it is always "working". The CRO feature constantly analyzes your form althrough its creation process and provides you with relevant tips to improve it.
Creating a new form is easy. When you first enter the form builder a small modal window will open offering 4 options to create a new form:
1. Blank Form
2. Template
2. Wizard
3. From URL
If you choose to close this window - you will actually be opening a blank form. 
You may also reach these 3 options from the Upper Menu > File > New
In order to do this you will need to:
| 1- | Choose "Blank" option. |
| 2- | In the form builder - Give your form a name ("Properties" panel > Form > Settings > General > Basic > General) |
| 3- | Drag an element from this "Elements" panel (on the left) and drop it on the canvas. |
| 4- | Once the element is on canvas - its settings and styles will be displays in the "Properties" panel (on the right), enabling you to configure the settings according to your needs. You will need to give each element a label text, placeholder text and user tip. Maybe you would like to make this element mandatory, or unique...all this can be done in the "Properties" panel under its two tabs: settings & style. |
| 4- | Once you are done adding your elements and configuring them - Publish your form and Start using it. |
This option enables you to set up your form in the easiest and quickest way: It offers you the choice of ready made free form templates. All you have to do is:
| 1- | Choose a form template |
| 2- | Press on the "Create Form" button |
| 3- | The form will now open on your canvas and you will be able to edit it: add/remove elements, change properties and style. |
| 4- | Give you form a name in the "Form Settings" (Right "Properties" panel : Form > Settings > Basic tab > General > Form Name) |
| 5- | Save your form and Publish your form and start using it. |
The wizard enables you to set up your form in an automated way. In 4 quick steps you can create your form. All you have to do is:
| 1- | Wizard Step 1: Give your form a name, description (not required) and form direction (RTL or LTR) |
| 2- | Wizard step 2: Add elements from a dropdown (creating a list of elements) |
| 3- | Wizard step 3: Add a custom thank you message or redirect to URL. |
| 4- | Wizard step 4 Choose a theme. |
| 5- | Give you form a name in the "Form Settings" (Right "Properties" panel : Form > Settings > Basic tab > General > Form Name) |
| 6- | Save your form. |
| 7- | Publish your form and start using it. |
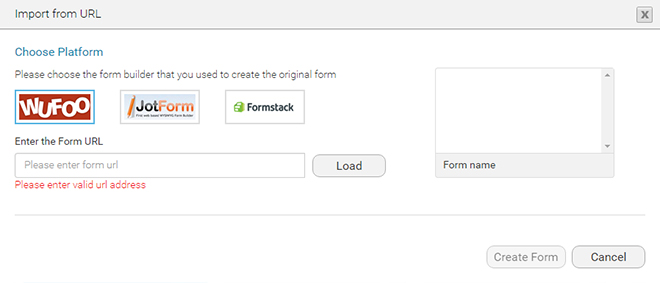
Import a form which was already set up in a different platform (Wufoo,JotForm or Formstack),
In order to do this you will need to:
| 1- | Choose the platform the form was created with: Wufoo, JotForm or Formstack. |
| 2- | Enter the form URL and press "load". |
| 3- | The form preview will appear in a thumbnail on the right |
| 4- | A table, containing the form fields will appear below, and it will allow you to create your new form on the basis of the url chosen. You will simply need to specify, in the second column, what type of element you would want to use for each field. For example: for "Your name" field you can use a textbox or a full name element. |
| 4- | You can make the fields mandatory if needed or even remove them. |
| 4- | Press on "create form" and the form will open on the form builder cavas ready to use. |
| 4- | You can now continue editing form, changing style/ properties etc. |
| 4- | Publish your form and start using it. |