Following is a detailed example of how to add a generate button to a List view page:
A- Steps in FormTitan
1. Create a new form.
2. Set up the Salesforce Get integration to populate the fields.
3. Create the PDF mapping.
4. Configure the button settings in the PDF.
5. Set up the Push integration to send the generated PDF files to Salesforce as attachments.
B- Steps in Salesforce
In the Salesforce standard objects you will have a Generate button set up for you, however if you wish to add this button to your search
layouts you will need to do the following:
1. Create a new button in Salesforce (a List view button).
2. Add the button to your search layout.
C- Test the button
A- Steps In FormTitan:
In this example we will create a form that populates contact information based on a contact ID from Salesforce, and we will use an SF button to view and generate PDF documents for multiple records.
1- Create a new form
- Drag a textbox and change its label to “Contact last”.

- Drag another textbox and change its label to “Contact first”.
- Drag a third textbox and change its label to ‘Assistant’.
- Drag a Hidden field and change its name to Contact_id.

- give your form a name: SF Button form1.
- save it.
2- Set up the Salesforce Get integration to populate the fields
- Authenticate with Salesforce.
- Choose “Contact” object.
- Set a condition:
Contact_id equals Contadt ID
- Map the fields:
Contact last → Last Name
Contact first → First Name
Assistant → Assistant Name
3- Create the PDF mapping
- You can create any type of PDF (Manual PDF, Auto PDF or both) in this example we will create a regular manual PDF and an Auto PDF.
- Press on “page” and upload your scanned pdf document.
- Open the ‘Element’ dropdown and add your fields ontop of the PDF.
- Now create another PDF mapping - Auto PDF.
- Press on the ‘Configure’ button.
- Turn on the ‘Enable auto PDF mapping’ and ‘Auto fit’ Checkboxes.
4- Configure the button settings in both of the PDF mappings
In the regular PDF
- Click on ‘Settings’ option in the toolbar.
- Go to the ‘Salesforce Button’ category.
- Press on the ‘Configure’ button.
- Open the ‘Salesforce object settings’ category and select the Object your Salesforce workflow is working with: Contact.
- Map the the record ID sent from SF to your form: Contact_id.
- Choose the Classic Salesforce version.
- In the Classic version you have 2 types of buttons you can create:
Detail page button - this will generate a code for a button that can be added to a specific record page.
List button - this will generate a code for a button that can be added to a record list page.
- Choose: Detail page button
- Grab the List button code (copy it)
- and last but not least - make sure the ‘Enable’ toggle is turned on.
- Press on ‘Apply’ and save the form.
5- Set up the Push integration to send the generated PDF files to Salesforce as attachments.
- Authenticate with Salesforce (already authenticated).
- Choose “Attachment” object.
- In the ‘Action’ category leave the “Create’ option selected.
- Map the fields:
Parent ID → Contact_id
File name → PDF mapping
Body → PDF mapping
- Press ‘Apply’
- Press on the ‘Add object’ button to add another push action.
- Choose “Attachment” object again.
- In the ‘Action’ category leave the “Create’ option selected.
- Map the fields:
Parent ID → Contact_id
File name → Auto PDF
Body → Auto PDF
- Press ‘Apply’ then ‘Finish’ and save the form.
B- Steps in Salesforce
In the Salesforce standard objects you will have a Generate button set up for you, however if you wish to add this button to your custom objects you will need to do the following:
1. Create a new button in Salesforce (a list view button)
- Give it a name.
- Choose "List button" in the Display type field.
- Select "OnClick JavaScript" option from the 'Content source' dropdown
- and paste the button code (from bullet #2) in the Textarea below.
2. Add the button to the search layout
- Press on the 'Setup' option in the top menu.
- Type the word 'Contact' in the Search box.
- and press on the 'Search layouts' link in the relevant SF object.
- Press 'Edit' in the 'Contacts List View' option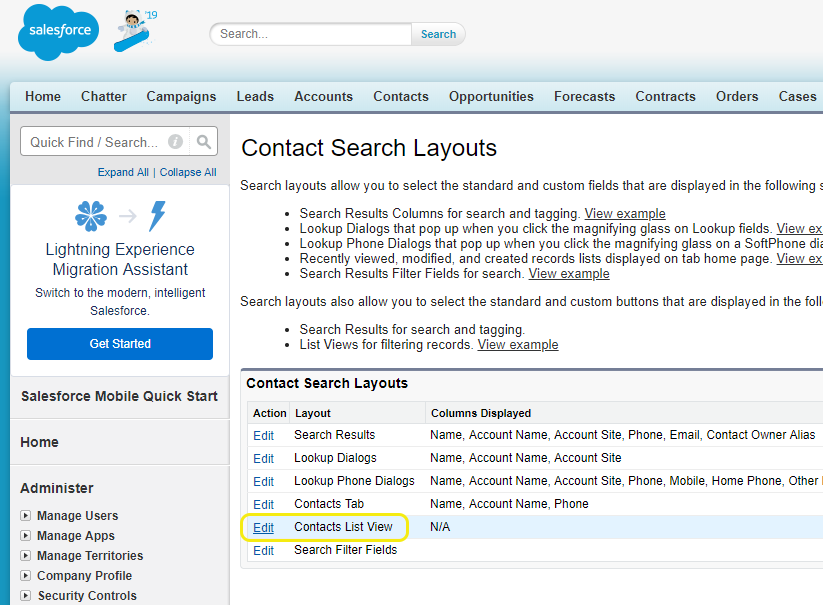
- In the 'Custom buttons' section:
Select your new button and move it from the 'Available buttons' column to the 'Selected buttons' column, by pressing on the 'Add' arrow.
C- Test the button
- Enter your salesforce account.
- Enter your Contact list view.
- Select a few records from the list.
- Press on the ‘Multiple generate’ button.
- A pop up window will then open and display the forms and PDF files available for generation.
In this case you will see PDF documents generated for each record you selected.