Having hidden fields in your form is pretty cool. It's kind of like pulling off a magic trick and using invisible aids for it. It allows you to store data in fields without making your form fillers aware of anything. This stored data is used to add logic & sophistication to your forms.
However, when it comes to checking your form, prior to launching it, it may get a little tricky...since you are not really a magician and the values
that return to these hidden fields are also invisible to you.
This is why we have added the 'Debug Mode', which "reveals" the hidden fields in your form (makes them visible to you only) to see the values in them. In addition, this mode also lets you open a modal window that displays all of the fields in your form and their values for debug purposes.
Following is a step by step example of how to create a form with a hidden field, and how to use the Debug Mode:
First Part - Creating a form with a hidden field
1- Create a new blank form.
2- Drag a Dropdown element to your form - we will populate this dropdown with all of the account names from your Salesforce account.
Change its label text to: Account name
and remove all of the list default items
3- Drag a Textbox - we will populate the account phone in it from Salesforce.
Change its label text to : phone
4- Drag a hidden field - we will store the account Id in it
Change its label to: account_id
5- Now configure the Salesforce integration:
- go to 'Properties' panel > Form tab > Settings > Salesforce integration category
- Press on '' button
- Authenticate with Salesforce
- select object: Account
and turn on the 'Execute on form load' - so this list will be populated when the form loads.
- In the "Condition" category choose the option "All" in the 'If multiple matches found...' radio button and enter a limit number (of 300 in this case).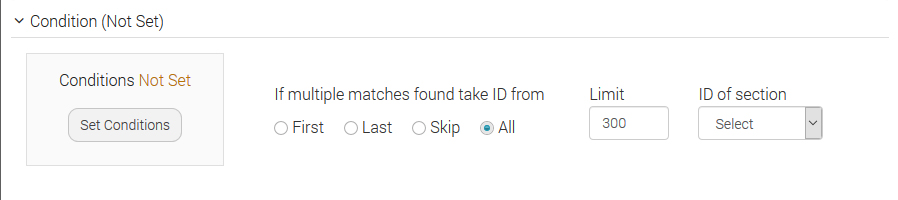
- Map fields: Account name --> Account Name
- Press on 'Apply' and you will see that 1 integration line has been created.
- Press on the 'Add Object' and choose "Account" again . This time do not turn on the "Execute on form load" checkbox.
- Set condition: Account ID equals account name value
- Choose 'First' in the 'If multiple matches found take ID from' radio button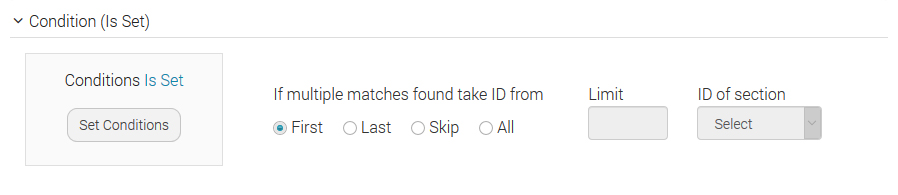
- Map fields:
account_id -- > Account ID
phone --> Account Phone
- Press on 'Apply'
- You will now see that 2 integration lines were created.
- Press 'Apply' and save your form.
Second Part - Using the debug mode
Please note that you must be logged in to your FormTitan account while you are testing the form (simply use 2 tabs of the same browser in
order to do this test - in the first tab log in and in the second paste the form url).
- Go to Properties panel > Form tab > Settings option > Debug Mode.
- Turn on the 'Show hidden fields' checkbox.
- Save the form
- Test the form:
- Publish it as 'URL' and you will see that your Hidden field is visible and has a pink back color.
- Choose an account from the dropdown to populate the phone and you will also show the value inside the hidden field.
- In addition, there is a Green icon on the right - press on it and a modal window will open containing all of your form fields and their values.
- This modal window has a "Move" icon in the window title, which you can use to move it.

Please note!
There is also a way to activate the 'Debug for hiddens' manually be adding a parameter to the form URL.
Steps to do this:
- Publish your form as URL and add the following string at the end of your URL in the address field of the browser:
FTDebugMode=true
for example: https://sub-domain.formtitan.com/516097424469?FTDebugMode=true
- Press enter to load the page
- Choose an account from the dropdown and you will now see the account ID populated in the hidden field.
Learn more about Salesforce forms
- Asking us questions is the fastest and most affective way to get assistance.
- Got a question? Check out our FAQs pages for answers to commonly asked questions.
- Check out our complete index of the FormTitan Topics organized by categories.
- Browse our topics directory to find the feature you are looking for.
- ContactStill haven't found what you were looking for? no problems... simply send us your inquiry.