Insert / Edit Table
This window will enable you to add a Table to your document, in order to display multiple Salesforce records.
The steps for adding a table are:
1- Set up the Table
2- Configure the columns
3- Add conditions
4- Add a summary row
5- Add Distinct filter
6- Split Table
7- Save the Table
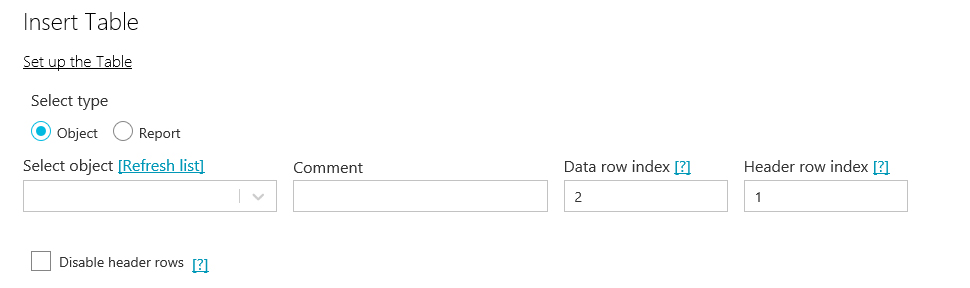
1- Set up the Table
Fill in these basic properties:
- Select type: Choose whether to pull data from a Salesforce object or from a Salesforce Report. Watch the video about pulling from a Report
- Select object: Choose a Salesforce object where you intend to read the data from.
- Comment: Give this object a comment, so you will be able to identify the action.
- Header row index: Specify the row number of your table header (it's "1" by default). Watch the video about Table Row index
- Data row index: Specify the row number of the data row in your table (it's "2" by default). Watch the video about Table Row index
- Disable header rows: This option will make sure the table headers are not rendered. Watch the video about Disable header rows
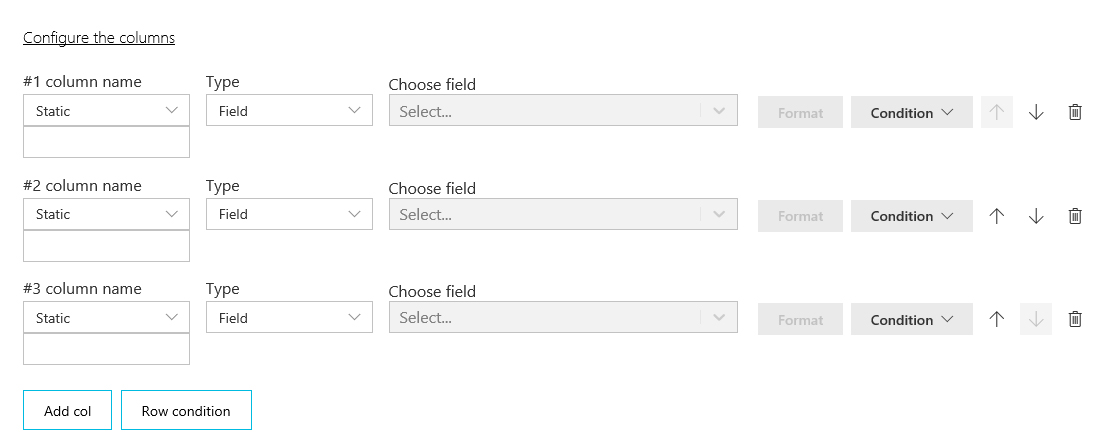
2- Configure the columns:
Please notice that the columns are numbered. These numbers will set the order of the columns in the Table.
Configure the columns by the following properties:
- Column name: Provide a header for your column using a Static text (For example: Account name), or choose "Dynamic" and pick a Salesforce field to pull the name from. Watch how to set the header name dynamically from Salesforce
- Type: Specify what kind of value you would like to draw into your column. (Choose Field / formula/ Empty/ RowIndex/ Conditional).
If you select "Field" you will need to choose a Salesforce field to map your column to.
If you choose "Formula" you will need to set the formula.
If you choose "Conditional" you will need to set a condition.
Watch the video about the Types dropdown in the Table
- Choose field: Select a field that belongs to the object you choose. For example Account Name
- Format: Each field you use has its own default format, and you can also press on the ‘Format’ button to change it.
Watch how to use the Table formats
- Condition: Set a condition on this cell, multi-cell or column. (for more detail - see bullet #3 - Add conditions)
- Order Arrows: Use these to change the order of your columns in the Table. Watch the video on setting the columns' order
- Trash icon: Press on this icon to delete the column.
- Add column: Press on this button to add more columns to the table.
3- Add conditions:
The composer Table element has built-in conditions, which you can use to slice the data you are displaying.
Following are the conditions:
- Cell condition
This option will allow you to show or hide the content of the specific cell based on a condition.
Watch how to show/hide table cells based on a condition
- Multi cell condition
This option will allow you to set the value in a specific cell based on an Else If condition.
Watch how to use the Multi-cell condition
- Column condition
This option will allow you to show or hide the content of the specific column based on a condition.
Watch how to show/hide a column based on a condition
- Row condition
This option will allow you to show or hide the content of the specific row based on a condition.
Watch how to show/hide table rows based on a condition
4- Add a summary row to your table.

The summary row is not mandatory. It allows you to add a final line to the table, in which you summarise your data.
Notice that the default number of columns for this row is, by default, the same as the number of columns you set for your table. But you can change it if you wish.
You will need to:
- Choose field type: Text / Formula - to enter free text or create a formula such as SUM, Average, etc.
For example: in columns #4 we will set: field type: Formula - formula: Sum, above
And press on ‘Save’.

5- Add Distinct filter![]()
This option allows you to make sure that you are not pulling records with duplicated values in the field you choose.
Read all about the Distinct option in the Table
6- Add Split Table
This option will allow you to split the data you display in the Table based on a selected field.
Read all about the Split table option
7- Save the Table
The final step is to press on the ‘Insert table’ button and add the table to the document.
In this step you will find:
- an "Insert" button (for the first time you save the table) or a "Save" button (for when the Table has been edited).
- a "Cancel" button.
- a "Recreate button" - this button appears only when the table is being edited. It is used to recreate the table from scratch after the dataRowIndex, headerIndex or summary row index are changed or when the table is not rendered as it should.
Watch a video about the 'Recreate table' button
Watch the video
Enjoy!